Create a React Project, Push It to GitHub, and Deploy With Netlify, From the Command Line
Published on March 20, 2023
This article covers creating a React project, pushing it to GitHub, and deploying it with Netlify from the command line, which is excellent for getting your projects up and running quickly and easily!
Introduction
In the last article, we covered how to create a local React environment with Vite to provide a practical approach to practicing React. In this article, I take it a step further by showing you how to create a GitHub repo, push it to GitHub, and deploy it with Netlify, all from the command line.
Step by step in instructions for installing the Netlify CLI and the GitHub CLI is provided in this article. The GitHub CLI is an excellent method for getting your React projects up and running quickly and easily!
Here is a checklist of what is needed:
Checklist
This command line checklist will reveal what you need to install; If the item is installed, a corresponding version number displays.
Command line install checks:
node -v
npm -v
winget -v
ntl -v
TIP: To copy code in the bash terminal, first select the code with the mouse by holding down left-click. Then, CTRL+SHIFT+C. to copy, and CTRL+SHIFT+V to paste.
Here is a list of the steps we will take:
Steps
- Open the VS Code Bash terminal
- Create a folder
- Create a Vite project
- Install the GitHub CLI
- Initiate a GitHub repo with the GitHub CLI
- Install the Netlify CLI
- Deploy with Netlify
Note: After creating a Vite project, you can skip to the "Create a GitHub repo from the command line" sections if you already have the GitHub CLI installed.
Bash terminal
We will be using the Bash terminal in VS Code. First, open up a new window in VS Code ( you can right-click the VS Code icon and choose new window ).
Next, click on view in the VS Code top menu and choose terminal ( shortcut: CTRL+~).
*If Bash is not your default, select the down icon located on the right side ( launch profile ), and choose Git Bash.*
Bash terminal commands we will use:
- ls - list files and directories
- cd - change directory
- mkdir - create a new directory
Create a folder
First, use the list files and directories command (ls) to see what's in your current directory.
Next, use the change directory command (cd) to navigate to a directory of your choosing to create a new folder.
The cd command is used to change directories in the terminal. Here's a brief tutorial on how to use it:
Using "cd" to change directories:
- Open your terminal.
- Type cd followed by the directory path you want to navigate to. For example, if you want to navigate to a directory called "Documents" that's located in your home directory, you would type cd ~/Documents and press Enter.
- To navigate up one directory, use cd .. For example, if you're currently in the "Documents" directory and you want to navigate up to your home directory, you would type cd .. and press Enter.
- To navigate to your home directory, simply type cd and press Enter.
- To navigate to the root directory, type cd / and press Enter.
That's it! With these simple commands, you can easily navigate around your file system using the terminal.
Once you are in a suitable directory of your choosing, create a new folder and name it using the make directory command (mkdir).
mkdir yourfoldernameAfter creating your new folder, use the change directory command (cd) to enter it.
cd yourfoldernameTIP: To clear the bash terminal, use CTRL+L. To cycle through your past commands/entries, use the UP ARROW and the DOWN ARROW.
Create a Vite project
We will use Vite to create a React project.
What is Vite? Vite is a tool that helps you build JavaScript applications for the web quickly and efficiently. It works well with modern web development frameworks and offers features that simplify development, like hot module replacement and optimized production builds. If you are starting out with web development, Vite is a great tool to help you get started!
To create a new Vite project, type in the following:
npm create vite@latestYou may see the following message. Choose "y" to proceed.
Need to install the following packages:
  create-vite@4.2.0
Ok to proceed? (y)
You will now be asked to name the project ( the default is vite-project ).
? Project name: » vite-projectNext, using the arrow keys, select React for the framework.
? Select a framework: » - Use arrow-keys. Return to submit.
React
Then, using the arrow keys, select JavaScript.
? Select a variant: » - Use arrow-keys. Return to submit.
JavaScript
That's it! You should see a Scaffolding project in your chosen directory with your chosen name.
Scaffolding project in C:\Users\larocca\Desktop\github\solo-project-pro-digital-business-card\solo-project-pro-digital-business-card...

Done. Now run:

  cd solo-project-pro-digital-business-card
  npm install
npm run dev-
Next, following the instructions, we will change to the projects directory ( your projects name )
cd solo-project-pro-digital-business-card -
Type npm install.
npm install -
Type npm run dev
npm run dev
If successful, your Vite project is now ready, and it can be viewed by hovering over the URL and CRTL+LEFT CLICK.
  VITE v4.2.0  ready in 509 ms

  ➜  Local:   http://127.0.0.1:5173/
  ➜  Network: use --host to expose
  ➜  press h to show help
After viewing your site, we must run a build command before proceeding.
A shortcuts menu will appear by pressing "h" in the bash terminal.
Shortcuts
  press r to restart the server
  press u to show server url
  press o to open in browser
  press c to clear console
  press q to quit
Now, press "q" to quit so we can proceed with running the build command ( your preview site will stop running ).
Let's look at what is currently in your project folder using the (ls) list command.
$ ls
index.html  node_modules/  package.json  package-lock.json  public/  src/  vite.config.js
Now, we will run the build command.
$ npm run buildLet's look again and see what is now in your project folder using the (ls) list command.
$ ls
dist/       node_modules/  package-lock.json  src/                                            test-create-from-terminal-02
index.html  package.json   public/            vite.config.js
As you see, we now have a dist folder. In React, the "dist" folder is created when you run the build command. This folder contains the optimized and minified production code that is ready to be deployed to the web.
Remember to run the build command before each deployment! If you forget to run the build command after making changes to your project, the deployed version of the site will not show the updates!
If you would like step-by-step instructions to remove the default boilerplate, create simple React components, and add basic CSS styling, check out my article: How to Create a Local React Environment with Vite
Tip: When typing in the bash terminal, use the Tab key to auto complete.
GitHub CLI
The GitHub CLI tool allows you to interact with your GitHub repositories directly from your command line interface. This means you can create a new repository, add collaborators, and open pull requests without leaving your terminal.
The GitHub CLI helps streamline your workflow by allowing you to perform these tasks quickly and easily from one central location.
Note: If you already installed the GitHub CLI, skip to the "Create a GitHub repo from the command" line section.
To install the GitHub CLI on Windows, in the bash terminal, run the following command ( you will be asked to agree to their terms ):
$ winget install --id GitHub.cliAfter installing, you must close and restart your terminal/VS Code.
Note: The Windows installer modifes your PATH. When using Windows Terminal, you will need to open a new window for the changes to take affect. (Simply opening a new tab will not be sufficient.)
Getting started with GitHub CLI
To get started with GitHub CLI, you will need to run the following command:
$ gh auth loginThen choose:
- GitHub.com
- HTTPS
- Yes (Authenticate Git with your GitHub credentials)
- Login with a web browser
- Then, copy your one-time code, and press "Enter"
A new window will open. Paste in your one-time code, continue, and click "Authorize github."
If successful, you will be prompted with "Congratulations, you're all set! Your device is now connected."
Create a GitHub repo from the command line
First, we need to initiate your project as a GitHub repository.
$ git initNext, to create a GitHub repo from the command line, run the following command:
$ gh repo createWhen prompted, choose:
Push an existing local repository to GitHubChoose the default path (.) by pressing enter:
? Path to local repository (.) Then the repository name :
? Repository nameYou can add a description:
? DescriptionThen, choose "Public" when prompted for visibility:
> PublicFinally, choose yes to add a remote:
? Add a remote (Y/n)Leave the default as origin.
Below is a screenshot of the entire process:
Commit
Now it's time to commit our changes and push our repo up to GitHub.
We can add all of our changes with one command as follows:
$ git add .warning: in the working copy of 'vite-project/.gitignore', LF will be replaced by CRLF the next time Git touches it
Note: If you see a similar warning, it will not negatively affect your project. The issue concerns how Git handles line feeds (LF) and carriage returns (CR). Unix systems use (LF) and Windows uses (CR), thus (CRLF).
Next, we will commit with the following command:
$ git commit -m "Initial"Finally, we will push the repo to GitHub with the following command:
$ git push --set-upstream origin masterCongrats! You will now see your repo on GitHub in your repository folder.
Netlify
How to install the Netlify CLI
To install the Netlify CLI, run the following command:
$ npm install -g netlify-cliOnce the Netlify CLI is installed, run the following command:
$ ntl initWhen prompted, choose to create & create a new site:
> Create & configure a new siteYou will now be asked to choose a Netlify team ( you might only have one ):
$ Team: (Use arrow keys)Next, you as asked to create a site name ( you can leave it blank and choose a name later):
$ Site name:Then you may be asked to configure Webhooks and Deploy Keys. Choose the default:
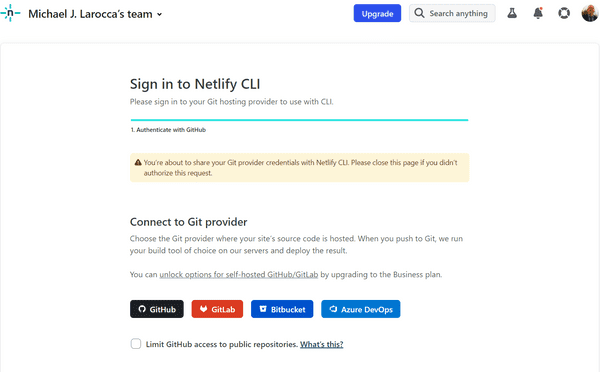
> Authorize with GitHub through app.netlify.comYou will now be redirected to the Netlify website to continue. You will be asked to sign in to Netlify CLI by choosing a Git provider. Choose GitHub.
Finally, click the Authorize netlify button.
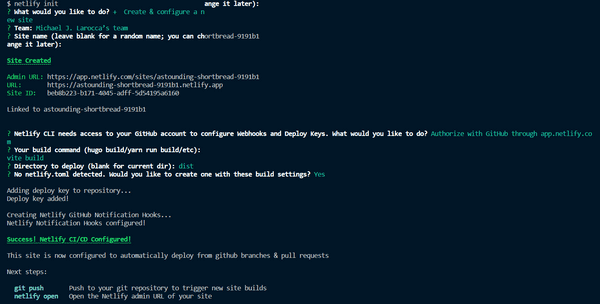
You will now be asked to log in with your GitHub password. Once successful, you will see the notification in the screenshot below:
Next, you will be asked for your build command. Use vite build:
vite buildThen, choose to deploy from the dist directory:
distIf you are prompted with "no netlify.toml detected," choose "Y" to proceed with creating the build:
? No netlify.toml detected. Would you like to create one with these build settings? (Y/n)Congratulations! The Netlify CI/CD is configured.
Commit all of the changes
Now it is time to commit all of the changes:
$ git add .Then commit:
$ git commit -m "Added Netlify deploy files"Finally, we push to repo up to GitHub:
$ git push origin masterThen, after committing all of the changes, run the netlify open site command.
To view the site, type in the following command:
$ netlify open:siteHover over the provided URL and "CTRL+LEFT-CLICK" to open the external website ( if prompted, click open ).
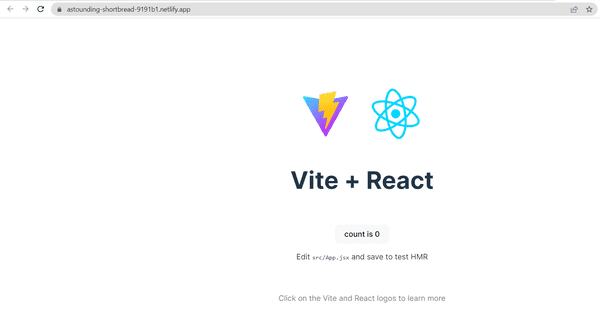
Congrats! Your site is now live!
Advance your career with a 20% discount on Scrimba Pro using this affiliate link!
Become a hireable developer with Scrimba Pro! Discover a world of coding knowledge with full access to all courses, hands-on projects, and a vibrant community. You can read my article to learn more about my exceptional experiences with Scrimba and how it helps many become confident, well-prepared web developers!
Important: This discount is for new accounts only. If a higher discount is currently available, it will be applied automatically.
How to Claim Your Discount:
- Click the link to explore the new Scrimba 2.0.
- Create a new account.
- Upgrade to Pro; the 20% discount will automatically apply.
Disclosure: This article contains affiliate links. I will earn a commission from any purchases made through these links at no extra cost to you. Your support helps me continue creating valuable content. Thank you!
Conclusion
Using the command line to create a React project, push it to GitHub, and deploy it with Netlify may seem daunting initially, but it's a straightforward process that can save you time and effort in the long run.
The GitHub CLI and Netlify CLI make it easy to manage your repositories and deployments directly from the command line.
Don't be intimidated by the technical jargon! With the step-by-step instructions provided in this article, you can get your projects up and running quickly and easily. So don't be afraid to try it and see how it can improve your React development workflow!
Let's connect! I'm active on LinkedIn and Twitter.
Are you now confident using the command line to initialize your React projects? Do you have a different method that works better for you? Please share the article and comment!
Please share it!


